How to convert HEIC to JPG using iMobie?
Converting HEIC (High Efficiency Image Format) files to JPEG (Joint Photographic Experts Group) format is a common need for many users, given the wide adoption of JPEG as a universal image format across various devices and platforms. HEIC, while offering superior compression and image quality, might not be supported by all devices or software. To bridge this compatibility gap, the process of converting HEIC to JPEG becomes essential. Thankfully, there are several straightforward methods available, ranging from using dedicated software and online converters to utilizing built-in operating system tools.
How to convert HEIC to JPG using iMobie?
Here's a step-by-step guide to converting HEIC to JPG using iMobie's AnyTrans:
Download and Install AnyTrans
Start by downloading and installing the AnyTrans software on your computer. You can find the software on the iMobie official website. Once the installation is complete, launch the application to begin the conversion process.
Connect Your Device
Connect your iOS device, which contains the HEIC files you want to convert, to your computer using a USB cable. AnyTrans will automatically detect your device and display its information on the main interface.
Access the Media Downloader
On the main interface of AnyTrans, you'll find various options for managing and transferring your device's content. Locate and click on the Media Downloader option. This feature enables you to transfer and convert media files, including HEIC images.
Choose HEIC Files for Conversion
Once you're in the Media Downloader section, you'll see a list of media categories such as Photos, Music, Videos, etc. Click on Photos to access your device's photo library. AnyTrans will display your photos in thumbnail view.
Navigate through your photo albums and select the HEIC images that you want to convert to JPG. You can select multiple images by holding down the Ctrl (Windows) or Command (Mac) key while clicking on the images.
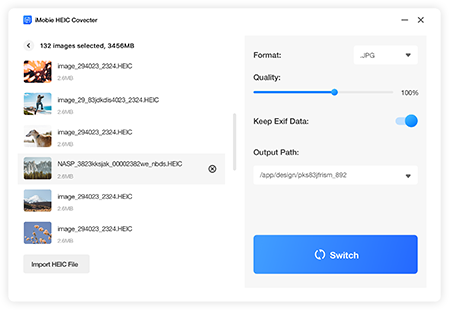
Select the Output Format
With the HEIC images selected, click on the Settings button in the upper-right corner of the window. A settings menu will appear, allowing you to customize various options for the conversion process.
In the settings menu, locate the Convert to option and choose JPEG as the output format. You can also adjust the output quality and destination folder according to your preferences.
Start the Conversion Process
After selecting the output format and adjusting the settings, click the Convert Now button to initiate the conversion process. AnyTrans will begin converting the selected HEIC images to JPEG format. The progress of the conversion will be displayed on the screen.
Once the conversion is complete, you'll receive a notification indicating the successful conversion of your HEIC files to JPEG. You can then access the converted JPEG images in the designated output folder on your computer.
Conclusion
Using iMobie's AnyTrans to convert HEIC to JPG offers a user-friendly solution for ensuring compatibility and ease of use across different devices and platforms. With just a few simple steps, you can convert your HEIC images to JPEG format, allowing you to share and view your photos without any compatibility issues. The intuitive interface and customizable settings of AnyTrans make the conversion process efficient and hassle-free, making it a valuable tool for managing your media files.
Frequently Asked Questions
- Can iMobie convert multiple HEIC files to JPG simultaneously, and does it maintain the original image quality?
- iMobie can convert multiple HEIC files to JPG format simultaneously, saving time and effort. It is designed to maintain the original image quality during the conversion process, ensuring that the JPG files are a true representation of the original HEIC images.